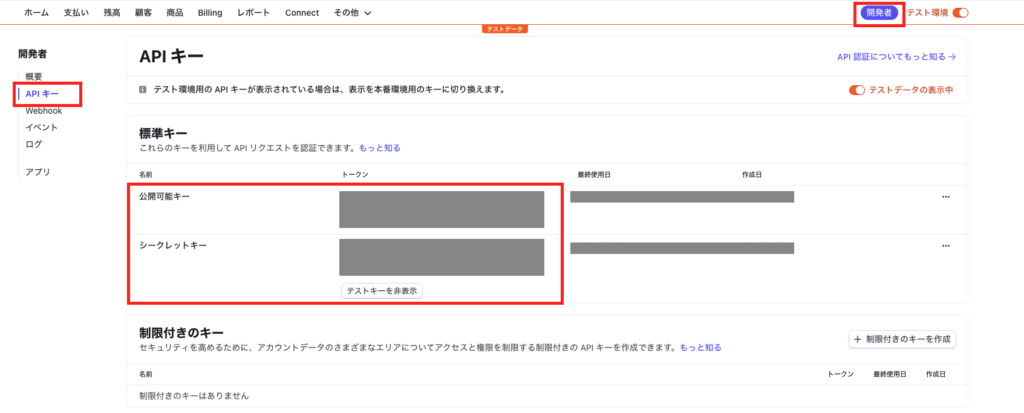
Stripeのキー情報を取得
コンソールからキー情報をゲットする

- .env編集
STRIPE_PUBLIC_KEY={公開可能キー}
STRIPE_SECRET_KEY={シークレットキー}- config/services.phpに追記
'stripe' => [
        'public_key' => env('STRIPE_PUBLIC_KEY'),
        'secret_key' => env('STRIPE_SECRET_KEY'),
],
composerでパッケージインストール
- stripeでの決済を簡単に行うためのパッケージを入れる
https://readouble.com/laravel/10.x/ja/billing.html
composer require laravel/cashier早速使ってみる
- routes/web.php
use App\Http\Controllers\StripePaymentController;

// 決済画面表示
Route::get('/payment', [PaymentController::class, 'index'])->name('payment.index');
// 決済処理実行
Route::post('/payment', [PaymentController::class, 'store'])->name('payment.store');- resources/views/payment/index.blade.php
<h2>決済ボタン表示</h2>
<form action="{{ route('payment.store') }}" method="post">
  @csrf
  <script
    src="https://checkout.stripe.com/checkout.js"
    class="stripe-button"
    data-key="{{ config('services.stripe.public_key') }}"
    data-amount="1000"
    data-name="決済フォーム"
    data-label="決済する"
    data-description="単発決済: 1,000円"
    data-image="https://stripe.com/img/documentation/checkout/marketplace.png"
    data-locale="auto"
    data-currency="JPY"
  ></script>
</form>
https://checkout.stripe.com/checkout.jsを使用することで、
簡単に決済フォームが生成できる

ここで各種情報を入力して支払うボタンを押下すると、
入力情報チェックをJSで行ってくれる。
入力内容がOKの場合、
<form>に設定されているアクション (StripePaymentController::store())にstripeEmail, stripeToken, priceがPOSTされるので、その情報を使用して決済実行や必要に応じてDB登録などを行う
- PaymentController.php
// (...省略)

use Stripe\Stripe;
use Stripe\Customer;
use Stripe\Charge;

class StripePaymentController extends Controller
{
    /**
     * 決済画面表示
     */
    public function index()
    {
        return view('payment.index');
    }

    /**
     * 決済処理実行
     */
    public function store(Request $request)
    {
        try {
          // APIキーをセットする
          Stripe::setApiKey(config('services.stripe.secret_key'));
          // 顧客を登録
          $customer = Customer::create(array(
            'email' => $request->stripeEmail,
            'source' => $request->stripeToken
          ));
          // 顧客に紐づく決済を登録
          $charge = Charge::create(array(
            'customer' => $customer->id,
            'amount' => 1000, // ここの金額はrequestで受け取るなりstore内で生成するなり
            'currency' => 'jpy'
          ));

          // DBに登録が必要な場合は$customerや$chargeの情報を使用する

          return redirect(route('payment.index', ['message' => '決済が完了しました!']));

        } catch (\Exception $e) {
          Log::error($e->getMessage());
          return redirect(route('payment.index', ['message' => '決済に失敗しました...']));
        }
    }
}
テストカードはこちら
https://stripe.com/docs/testing#cards
上記を使用することで、
実際のカードを使用せずにテスト決済の実行や失敗テストなどができる


LaravelでStripeと連携して単発決済を行う